Turning your backyard into a personal wellness haven is one of the most rewarding upgrades you can make as a homeowner. But between dreaming about those first soaks and actually stepping into warm, bubbling water, there’s a real installation process that can go sideways fast. Poor site preparation, undersized electrical circuits, and skipped water chemistry steps are the mistakes that turn exciting projects into expensive headaches. This guide walks you through every phase of hot tub installation, from foundation prep to the first safe soak, so you can avoid those pitfalls and enjoy lasting comfort right in your own backyard.
Table of Contents
- What you need before you start
- Site preparation and foundation setup
- Electrical installation and safety
- Filling, balancing, and priming your hot tub
- Troubleshooting: Common hot tub installation mistakes
- What experts wish every homeowner knew about installing a hot tub
- Ready to transform your backyard? Shop premium hot tubs and accessories
- Frequently asked questions
Key Takeaways
| Point | Details |
|---|---|
| Solid foundation is essential | A level, strong base prevents shifting and supports the weight of your hot tub. |
| Follow electrical codes | GFCI protection and proper wiring ensure safety and reliable operation. |
| Balance water chemistry | Testing and adjusting water protects your spa and your health. |
| Avoid common mistakes | Proper site prep and expert help reduce costly installation errors. |
| Wellness requires quality | High-quality acrylic tubs provide lasting benefits over easy-to-setup inflatables. |
What you need before you start
After outlining the benefits and pitfalls, let’s clarify what you must gather and plan before breaking ground. Good preparation is what separates a smooth installation from a stressful one.
The very first thing to understand is weight. A solid, level foundation must support 5,000 or more pounds when your hot tub is filled with water and people. That number surprises most homeowners. It means your foundation choice is one of the most critical decisions you’ll make before the tub ever arrives.
Here’s a quick comparison of the three most common foundation types:
| Foundation type | Durability | Drainage | Relocatability | Best for |
|---|---|---|---|---|
| Reinforced concrete | Excellent | Poor (needs grading) | Very low | Permanent installs |
| Compacted gravel | Good | Excellent | Moderate | Budget-friendly, flexible |
| Interlocking pavers | Good | Good | Moderate | Aesthetic appeal |
Beyond the foundation, electrical requirements are non-negotiable and carry real safety stakes. Most quality hot tubs require a dedicated 240V circuit with GFCI protection. Electrical missteps cause roughly 3,000 annual spa electrical injuries in the U.S., which is exactly why we recommend professional installation for anything involving wiring.
Before your hot tub arrives, gather these essentials:
- Garden hose with inline filter to prevent scale and metal buildup during filling
- Water testing kit or test strips for pH, alkalinity, and sanitizer levels
- Startup chemical kit including pH adjusters, alkalinity booster, and sanitizer
- Submersible pump for draining and future water changes
- Non-slip decking or matting for the surrounding area
- Weatherproof cover and cover lifter
Our spa preparation guide offers a detailed pre-installation checklist if you want to go deeper on any of these items.
Site preparation and foundation setup
Once you’ve assembled the essentials, it’s time to prepare your backyard and lay down a reliable foundation. Rushing this step is the single most common reason hot tubs end up unlevel, cracked, or underperforming within a few years.
Follow these steps to set yourself up correctly:
- Mark the area. Use stakes and string to outline a footprint at least 2 feet wider than your hot tub on all sides. This gives room for access panels and future servicing.
- Check for level. Use a long level or laser level across the entire area. Even a small slope causes stress on the shell and frame over time.
- Clear and excavate. Remove grass, roots, and organic material. Organic matter decomposes and causes settling, which is a major problem under a 5,000-pound load.
- Address drainage. Grade the surrounding area so rainwater flows away from the tub, not underneath it. Poor drainage leads to erosion, shifting, and potential electrical hazards.
- Lay your chosen base. For concrete, pour a reinforced slab at least 4 inches thick with rebar or wire mesh inside. For gravel, use 4 to 6 inches of compacted crushed stone.
- Allow proper curing. Concrete needs a minimum of 28 days to fully cure before placing a heavy hot tub on it. Gravel bases can be used immediately after compaction.
“Concrete is preferred over gravel for permanence, but gravel offers better drainage and relocatability. Pavers are viable when placed on a well-compacted base.” — homeindepth.com
If your yard has a slope, you’ll need to build retaining walls or terracing before laying your base. Sloped sites need retaining structures to prevent the foundation from shifting or eroding over time. Never place a hot tub directly on soil or grass, no matter how firm it feels. Settling is inevitable and will void most warranties.
Pro Tip: Plan drainage before you pour concrete. A simple French drain or slight slope in the surrounding patio can prevent years of water pooling issues. Also consider future flexibility. Gravel bases allow you to relocate the tub if you redesign your outdoor space. Concrete locks in placement permanently, so think ahead about where you want it for the long term.

The way you handle site prep also affects your landscaping potential. If you’re building a true outdoor retreat, explore our hot tub landscaping ideas for design inspiration that complements your foundation choice. You can also review various foundation options as part of your planning process.
Electrical installation and safety
With your foundation secure, electrical setup deserves equal attention and strict safety compliance. This is where many well-intentioned DIY projects hit a hard wall.
Here’s a summary of the key NEC (National Electrical Code) requirements you need to know:
| Requirement | Specification |
|---|---|
| Circuit type | Dedicated 240V, 50-amp |
| GFCI protection | Required on all circuits |
| Disconnect location | 5 to 50 feet from tub |
| Bonding | All metal components must be bonded |
| Buried wire depth | Minimum 12 inches (24 inches recommended) |
NEC Article 680 governs hot tub electrical installation, requiring a dedicated 240V 50-amp GFCI-protected circuit and a clearly accessible disconnect located between 5 and 50 feet from the tub. These aren’t suggestions. They’re code.
Common electrical mistakes homeowners make:
- Using an existing circuit instead of running a dedicated line
- Skipping the GFCI breaker to save money
- Placing the disconnect too close to the water source
- Using undersized wiring that overheats under load
- Forgetting to bond metal components, which is a serious shock hazard
It’s worth knowing that plug-and-play 120V models are easier for a DIY setup and require only a standard GFCI outlet. However, they heat water significantly slower and simply can’t deliver the jet power or temperature performance of a hardwired 240V system. For a true wellness experience, hardwired is the way to go.
Pro Tip: Before hiring an electrician, confirm they have experience with spa or pool electrical work specifically. NEC Article 680 requirements are different from standard residential wiring, and not every electrician is equally familiar with them. Always ask for a permit and inspection, because it protects your home’s resale value and your family’s safety.
“A licensed electrician familiar with NEC Article 680 is not optional. It’s the difference between a safe, code-compliant installation and a potential liability.”
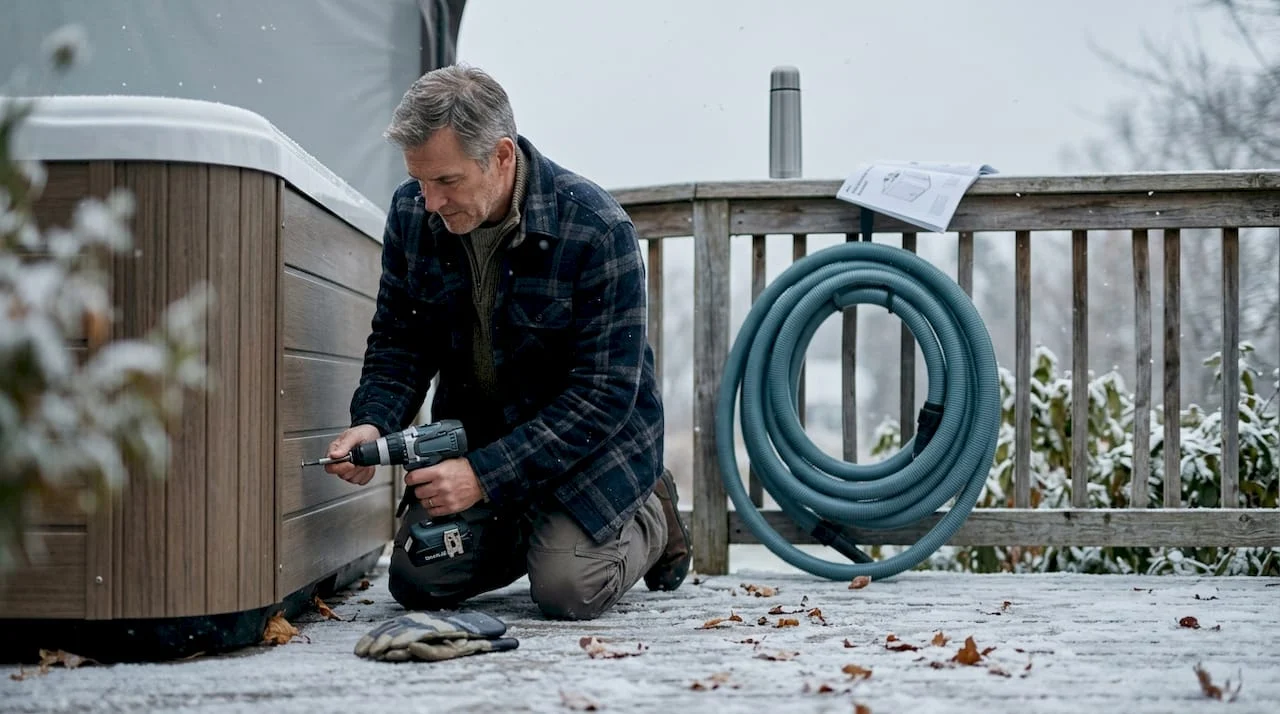
Filling, balancing, and priming your hot tub
Once your electrical setup is inspected and ready, you can move to the final critical phase: filling and water preparation. Many homeowners rush this part, excited to start soaking. Don’t. Proper water chemistry from day one protects your equipment and your health.
Follow this sequence carefully:
- Attach a hose filter. This removes metals, minerals, and sediment that cause scale buildup and staining. Run water through the filter well (the opening inside the filter compartment), not directly into the shell, to prime the pumps automatically and reduce air locks.
- Fill to the indicated waterline. Most hot tubs have a marker inside. Overfilling wastes chemicals and can cause pump issues.
- Add a sequestrant. This is a metal-binding chemical that neutralizes any metals that slipped through your filter. Add it before turning on the heat.
- Power on and prime pumps. Run the jets briefly to purge any trapped air. You may hear gurgling or spitting. That’s normal and will stop within a few minutes.
- Begin heating. The
water filling process recommends heating to around 80°F before adding your main balancing chemicals. This helps them dissolve evenly.
- Balance the water chemistry in this order: total alkalinity first (80 to 120 ppm), then pH (7.4 to 7.6), then calcium hardness (150 to 250 ppm), then sanitizer (chlorine at 3 to 5 ppm or bromine at 4 to 6 ppm).
- Test and wait. Test again after 30 minutes of circulation. Adjust if needed. Heat to your target temperature (usually 100 to 104°F) only after chemistry is stable.
Watch for these early warning signs after filling:
- Foamy water usually means residue from the manufacturing process or low calcium hardness
- Cloudy water often points to high pH or insufficient sanitizer
- Green tint can indicate metal contamination. Add more sequestrant.
- Strong chemical smell may signal that pH is too low or sanitizer is off balance
Pro Tip: Never add chemicals all at once. Space additions 15 to 20 minutes apart with the jets running. This prevents chemical interactions that can damage your equipment or irritate your skin. Keep a dedicated measuring cup and always add chemicals to water, never the reverse.
For more step-by-step guidance on your first fill, our hot tub filling tips article covers the process in detail. Once you’re up and running, our hot tub maintenance guide will help you stay on top of water care week to week. And if you’re still in the shopping phase, our resource on choosing a hot tub can help you find the right model before you install.

Troubleshooting: Common hot tub installation mistakes
Even with a careful approach, challenges can arise. Here’s how to recognize and fix the most typical hot tub installation issues before they become expensive repairs.
The most frequent mistakes homeowners encounter include:
- Uneven foundation. If the tub wasn’t leveled properly during site prep, water distributes unevenly and the shell can crack over time. Fix it early by shimming the base or, in serious cases, re-pouring.
- Wrong electrical setup. An undersized breaker or missing GFCI trips repeatedly and can damage the control board. Always match the breaker size to the manufacturer’s specifications exactly.
- Skipping the water test before soaking. Unbalanced water irritates skin and eyes, and also corrodes jets and heater elements. Always test before anyone gets in.
- Poor cover management. Leaving a wet cover on a hot tub without UV protection causes it to degrade rapidly. Use a cover conditioner regularly.
- Ignoring the equipment bay. The access panels on the side of your tub need 12 to 18 inches of clearance for servicing. Blocking them with decking or landscaping creates major maintenance headaches.
Inflatable hot tubs are simpler to install since you just inflate, connect to a GFCI outlet, and fill. But they offer lower quality and fewer wellness features compared to acrylic shells. If relaxation and hydrotherapy are your goals, acrylic models deliver far more value over time.
Pro Tip: Before your hot tub is even delivered, walk the delivery path and measure every gate, corner, and doorway. Many installation delays happen because the tub can’t physically reach the installation site. Crane lifts are an option but add cost, so plan ahead.
If you’re thinking about how to make your hot tub area more social and enjoyable after installation, our hot tub party ideas page has some great inspiration for entertaining family and friends.
What experts wish every homeowner knew about installing a hot tub
With the installation steps covered, it’s worth stepping back and sharing some deeper lessons from experienced installers and homeowners who’ve been through the process.
The most consistent insight we hear is this: professional installation almost always pays for itself. Not because homeowners aren’t capable, but because the stakes are high at every stage. A foundation that settles even an inch throws off the entire shell. An electrical connection that’s slightly undersized may work fine for six months and then fail under heavy winter use. The cost of fixing these problems after the fact usually exceeds what professional installation would have cost upfront.
Location is another thing that surprises people once they’re living with their hot tub. Many homeowners install a tub in the most private corner of the yard, only to realize later that it’s a long, cold walk from the house in winter. Others place it near a fence without thinking about prevailing wind direction, and spend every soak shivering on one side. Think about your daily use pattern, not just how it looks on paper.
Site drainage is quietly the most underestimated factor in long-term satisfaction. A tub that sits in a yard prone to pooling water will eventually develop mold around the base, electrical moisture issues, or soft ground beneath the foundation. Our site prep tips address this in practical terms, and it’s worth revisiting before you finalize your layout.
The biggest regret we see from new owners isn’t about the tub itself. It’s about the environment around it. People who invest in good lighting, a clean surround, and a weather-resistant cover and lifter use their hot tub far more consistently. Those who install it bare and plan to “add stuff later” often find that later never comes. The setup you create on day one becomes the wellness routine you either keep or abandon. Our beginner’s installation guide reinforces this idea with practical first steps for new owners.
Ready to transform your backyard? Shop premium hot tubs and accessories
You now have a clear picture of what a successful hot tub installation looks like from start to finish. The next step is finding the right tub for your space, your lifestyle, and your wellness goals.

At Lifestyle Outdoor, we carry a curated selection of premium shop hot tubs built for real performance and lasting comfort. Whether you’re drawn to the award-winning design of Hot Spring Spas or looking to accessorize your existing setup, we have everything you need. Browse our full collection of spa accessories to complete your backyard retreat with covers, steps, lighting, and more. Our team is ready to help you plan, select, and install your perfect outdoor oasis.
Frequently asked questions
Do I need a permit to install a hot tub?
Most cities require permits for both the electrical work and any structural changes involved in a hot tub installation. Check with your local building department before you start, as requirements vary by municipality.
What is the best foundation for a hot tub?
A reinforced concrete slab at least 4 inches thick is the most stable and permanent option, since hot tub installation requires a foundation capable of supporting 5,000 or more pounds. Compacted gravel is a strong alternative if you need better drainage or may want to relocate the tub later.
How long does hot tub installation take?
Professional installations typically take one to two days for site preparation, delivery, and basic setup. Add another 24 to 48 hours for the water to heat and for chemistry to fully balance before your first soak.
Can I install a hot tub myself?
DIY site preparation is feasible for motivated homeowners, but electrical installation should always be handled by a licensed electrician. Skipping professional electrical work contributes to 3,000 annual spa electrical injuries in the U.S. each year.
What is the difference between inflatable and acrylic hot tubs?
Inflatable models are simpler to set up and require only a GFCI outlet, but they are less durable and deliver fewer hydrotherapy and wellness benefits compared to acrylic hot tubs.